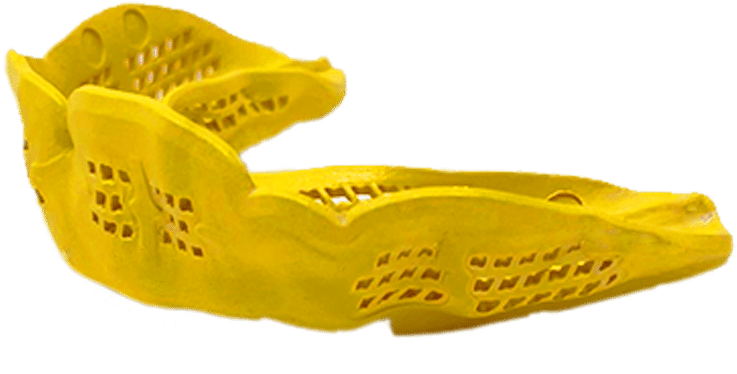
MOUTH GUARD FITTING VIDEOS
Congratulations! You now own the only Professional Night Guard that can be molded at home, without the machines Dentists use. And for 90% less than they charge! They start flat, just like the custom night guards from Dentists. So the fitting process is different than standard mouthguards. But it’s easy- just follow the videos. And expect the mouthguard to be different too:
Most retail “Night Guards” for Bruxism, TMJ etc. are just re-branded sports mouth guards. They’re made with cheap transparent material that’s Soft and Springy, and can encourage chewing, teeth grinding, and clenching while you sleep. And an unwanted all night “workout” for your jaw. That can cause soreness, headaches, and other health issues.
Your BulletProof is made from an Advanced Composite Material that’s much firmer and non-compressible, just like Professional Custom Dental Night Guards! This material feels more natural, and doesn’t encourage clenching and grinding teeth. It’s also more durable, and protects your teeth better from the forces of grinding and clenching.
It has Integrated Fresh Air and Saliva Hygiene Channels, and is The Most Hygienic Night Guard On The Planet! While our material is similar to professional night guards, our new design is a significant advancement: Because even profession bite guards trap stale saliva against your teeth and gums- all night every night. Which can promote Bacteria Growth, Tooth Decay, Gum Disease, and Bad Breath. Studies show that consistent, natural saliva flow is necessary to prevent bacteria build up and the other associated health issues. Your BulletProof is designed with fresh air and saliva Hygiene Channels to prevent these issues. It’s also incredibly minimal and breathable, to maximize the oxygen to your brain and body- for a healthier, more refreshing sleep.
They’re also Economical: Because they last longer. And because we’ll Refund your order, without having to return it, if you’re not happy. And we’re the only company that will send you a new one FREE if you chew through or damage it! (30 Day Refund w/o Return, & 1 Year Free Replacement, for Registered Buyers only, to prevent fraud. So please Register below so we can help you if you need it!)
Follow the fitting videos closely. And if you have any questions, we’re here to help! Just email us at info@BulletProofMouthGuards.com. And if you have any issues, or if these pro style mouth guards just aren’t for you, PLEASE 🙏 don’t leave a negative review: If you’ll give us a chance and a little Grace, we’ll make sure you’re happy! We’ll send you a free replacement if needed, or we’ll refund your order- it’s up to you (must be Registered above). You don’t even need to return it. Because as a small Made In The U.S.A. Sports Technology Company, we’re also athletes and teeth grinders who wear them ourselves, and we’re parents raising kids who wear them too. So we get it! And we promise you and your family, the same great support that we want for ours!
Your BulletProof NightGuard is the result of Advanced Design and Materials with a simple goal: Helping you get a Better, More Natural, and Healthier Sleep. Retail night guards in stores and online haven’t changed much in 50 years. And your BulletProof is a significant upgrade- that you wear all night every night- for minimal cost. There are over 250,000 people using BulletProof mouthguards now, and they all got a great fit by following the same videos. So trust the process- just do exactly what the videos say, when they say it– and you’ll get a great fit too! (Material: Advanced Thermoplastic Composite with KEVLAR® Aramid fibers. No Latex, BPA, PVC, or Phthalates.)
Finally a Fully Custom Professional Night Guard that can be molded at home,
without the special machines that Dentists use. And for 90% less than they charge!
IT’S THE WORLD’S THINNEST, MOST BREATHABLE, AND MOST HYGIENIC NIGHT GUARD.
And we hope you love it too!
Select your Fitting Video now:
Standard Adult & Youth Fitting Videos
Video Part One: Instructions & Tips

Video Part Two: Fitting
Written Instructions (Must Watch Video Too)
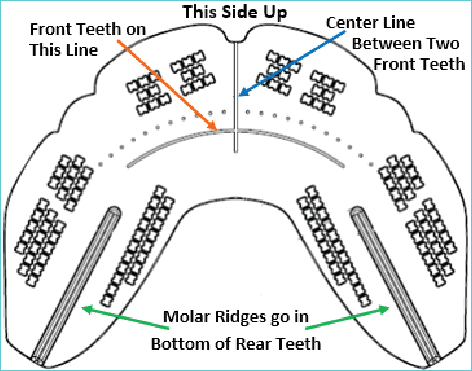
Important: This material is very unique, you must follow instructions exactly! Do NOT use boiling water. Fit in front of a bathroom mirror. You’ll heat the unit, line it up per this diagram, & bite down to hold the unit in place. Then you’ll fold it up against your teeth, close your mouth & suck to customize your fit. Don’t worry, you can re-do it if you get it wrong!
Do NOT Use Boiling Water – It’s too hot & will ruin the unit!
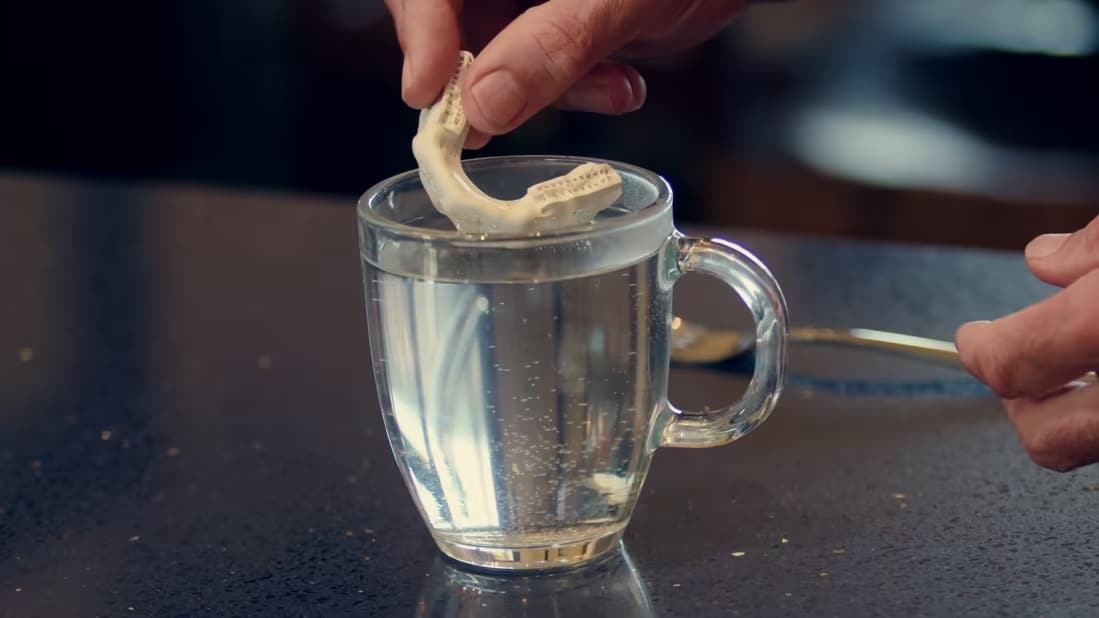
Boil 8oz (1 cup) of water in microwave, & then add 3oz (a little less than 1/2 cup) of room temp tap water, to cool it to the right temp. Or use hot water from a coffee or espresso machine (Keurig, Nespresso, etc.) it’s the right temp. Set the hot water, mouthguard, fork & phone (use as timer!) in front of a bathroom mirror.
Heat the unit in the hot water for 45 seconds. Remove it with a fork.
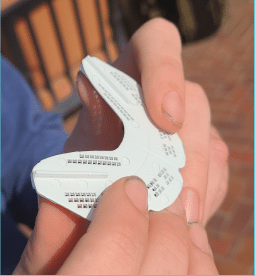
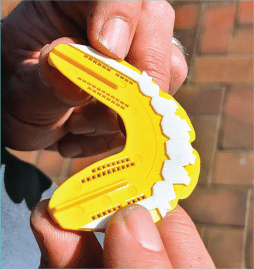
Hold it like this, with your thumbs on the bottom of the unit, on the thick cush pads.
Molding/Fitting
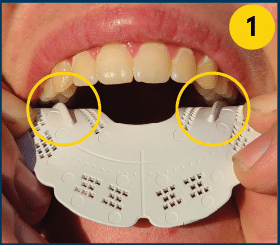
While looking in your mirror: Tilt your head back to see the bottom of your Molars (rear teeth).
- Push The Molar Ridges Up Into Your Molars, & hold it there.
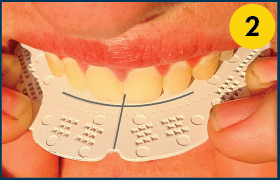
Now tilt your head forward, & slide the unit to:
- Center Your Two Front Teeth on the lines. Use your tongue to help.
- Bite down lightly to hold it in place.
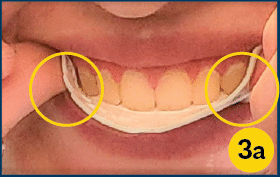
Quickly Fold Up the SIDES First!
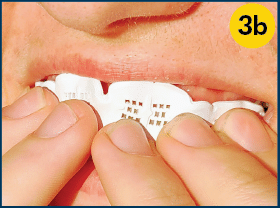
Then the Corners & Front of the unit, under your lips.
- Don’t try to flatten it with your fingers. Close your mouth fast and use your lips to flatten it.

Close Your Mouth & Suck for 30 seconds, using your lips to pull the unit flat against your teeth.
- Use your tongue to push the inside against your teeth while you suck. Remove.
Fine Tune NOW
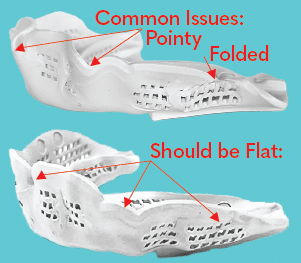
Flatten any areas along the top edge that are Folded or feel Pointy IMMEDIATELY NOW:
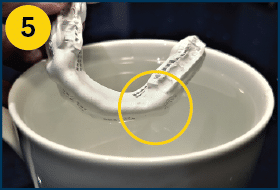
Reheat one small pointy area at a time in the water for ~10-15 seconds, until it starts to soften.
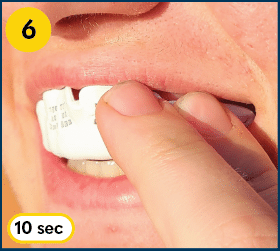
Put in mouth & use fingers to gently hold the area flat. Repeat for any area you want to flatten, or make more comfortable. Reheat the water if needed. *You can refit the entire mouthguard if needed.
Finally: You should be able to talk w/ it in your mouth. You should have to use your tongue or fingers to remove it.
Too tight? Heat in a microwave for 5 seconds only & check fit. Repeat until comfortable.
Too loose? Reheat water, & warm unit for 3-5 seconds only! Place in mouth and SUCK HARD for 60 seconds. Repeat if needed.
How to Fit Mouth Guard For Braces
Normally mold at home mouthguards cannot be used with braces, because braces melt into them during the molding. The mouthguards harden onto braces as they cool, and can tear them off when removing. So brace wearers have to buy non moldable. Because they get stuck on braces during molding, and can tear them off. So brace wearers have to buy “One Size Fits All” braces mouthguards that are bulky, cause gaging, and make it hard to breathe. Or spend hundreds of dollars to have a Dentist or Orthodontist custom-fit a mouthguard for braces. Until now:
We used Advanced Engineering to design the Mouthguard & Brace Guard system together, to create
THE SIMPLEST POSSIBLE SOLUTION, TO CUSTOM FIT A MOUTH GUARD FOR BRACES AT HOME.
Purpose Built for Braces, with Intelligent Design Features not available anywhere else: The Brace Guard system allows you to easily custom mold your mouth guard with braces. And is designed to create a small space between the mouth guard and braces- for added protection, and to allow for teeth movement from adjustments. And we made it REMOLDABLE, so you can adjust the fit if your teeth move significantly. Designed for elite performance, it’s the Thinnest, Most Breathable, and Strongest mouth guard for braces! We hope you appreciate this elegantly simple solution, that finally makes it affordable to have a pro level custom fit braces mouth guard.
Fitting Tip: Sucking, and pushing it against the back of your teeth with your tongue, is what makes a mouthguard stay on your teeth. Suck hard to start with a tight fit. Because it will fit looser when you remove the Brace Guard, to allow for brace adjustments and teeth movement. Just trust the process- and do exactly what the videos say, when they say it.
CONGRATULATIONS!
You’ll be the only one around with braces, that has a Custom-Fit Braces Mouth Guard!
(Be sure to follow the videos very closely for a great fit!)
Braces Fitting Videos
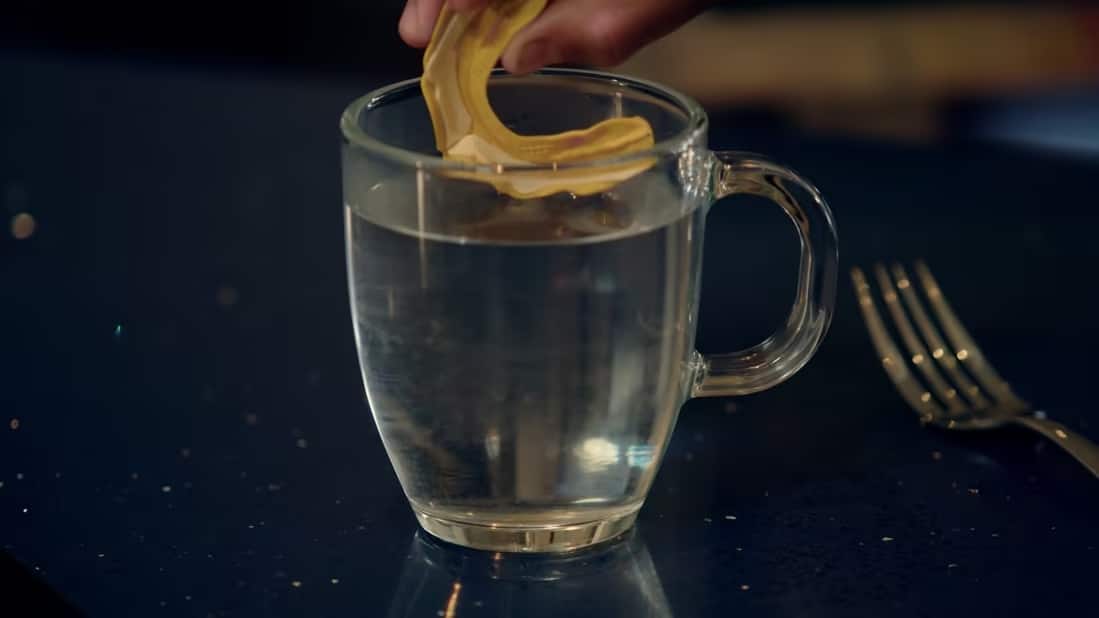
Video Part One: Instructions & Tips

Video Part Two: Fitting
Written Instructions (Must Watch Video Too)
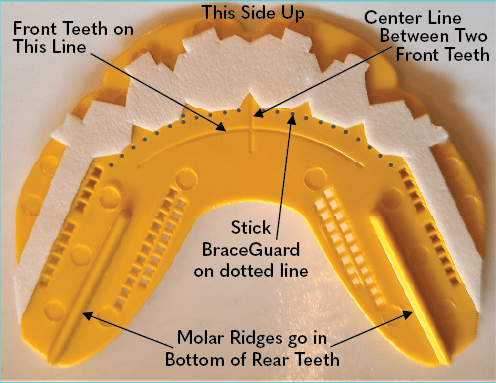
Important: This material is very unique, you must follow instructions exactly! Brace wearers, stick the included “BraceGuard” on the dotted line exactly as shown. Then follow the standard instructions. Fit in front of a bathroom mirror. You’ll heat the unit, line it up per this diagram, fold it up against your teeth, close your mouth & suck. Don’t worry, you can re-do it if you get it wrong!
Do NOT Use Boiling Water – It’s too hot & will ruin the unit!
Boil 8oz (1 cup) of water in microwave, & then add 3oz (a little less than 1/2 cup) of room temp tap water, to cool it to the right temp. Or use hot water from a coffee or espresso machine (Keurig, Nespresso, etc.) it’s the right temp. Set the hot water, mouthguard, fork & phone (use as timer!) in front of a bathroom mirror.
Attach BraceGuard. (Remove it after fitting)
Heat the unit in the hot water for 45 seconds. Remove it with a fork.
Hold it like this, with your thumbs on the bottom of the unit, on the thick cush pads.
Molding/Fitting
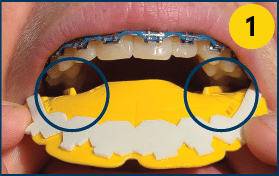
While looking in your mirror: Tilt your head back to see the bottom of your Molars (rear teeth).
- Push The Molar Ridges Up Into Your Molars, & hold it there.
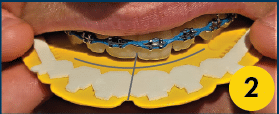
Now tilt your head forward, & slide the unit to:
- Center Your Two Front Teeth on the lines below the Brace Guard. Use your tongue to help.
- Bite down lightly to hold it in place.
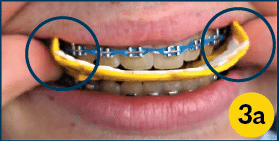
Quickly Fold Up the SIDES First!
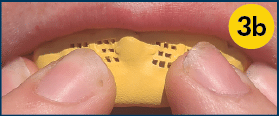
Then the Corners & Front of the unit, under your lips.
- Don’t try to flatten it with your fingers. Close your mouth fast and use your lips to flatten it.

Close Your Mouth & Suck for 30 seconds, using your lips to pull the unit flat against your teeth.
- Use your tongue to push the inside against your teeth while you suck. Remove.
IMPORTANT! TO REMOVE, pull it off the back teeth first to tilt it. Next, pull it off the front teeth. (Reverse to put it on)
- After you finish the sections below, you will remove the BraceGuard, and it will fit much looser.
Fine Tune NOW
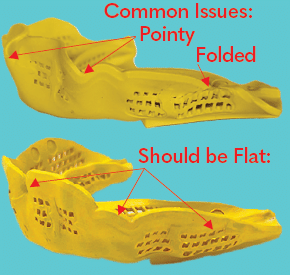
Flatten any areas along the top edge that are Folded or feel Pointy IMMEDIATELY NOW:
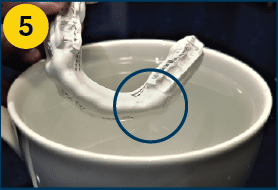
Reheat one small pointy area at a time in the water for ~10-15 seconds, until it starts to soften.
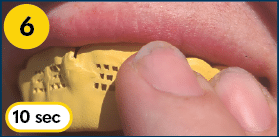
Put in mouth & use fingers to gently hold the area flat. Repeat for any area you want to flatten, or make more comfortable. Reheat the water if needed. *You can refit the entire mouthguard if needed.
Finally: You should be able to talk w/ it in your mouth. You should have to use your tongue or fingers to remove it.
Too tight? Heat in a microwave for 5 seconds only & check fit. Repeat until comfortable.
Too loose? Reheat water, & warm unit for 3-5 seconds only! Place in mouth and SUCK HARD for 60 seconds. Repeat if needed.
How to Fit Mouthguard With Fight Guard Insert
Note: Many Wrestlers, BJJ etc. prefer our standard mouthguard, for the most minimal feel. Because it’s the same exact mouthguard and same advanced protection. Just without the FightGuard insert. Face striking sports like Boxing and MMA generally prefer the added protection from the insert. The Fighting mouthguard version comes with two FightGuard inserts, and the mouthguard is remoldable. So you can try it with and without the insert if you’d like.
What’s the benefit of the FightGuard Insert System? Studies show that creating an “air space” between your teeth and your mouth guard, dramatically increases protection. Because each impact has to bend the mouthguard through the space, which absorbs and slows the impact, before it reaches your teeth. When a mouthguard fits directly against your teeth, much more energy and movement passes directly into your teeth. But creating an air space requires a very complex (and very expensive) custom molding procedure. Until now:
We designed the FightGuard & Mouthguard together, using Advanced Engineering & special FDA compliant foams & adhesives, to create THE SIMPLEST POSSIBLE SOLUTION, SO FIGHTERS CAN CUSTOM FIT A MOUTHGUARD WITH “AIR SPACE” TECHNOLOGY AT HOME.
The FightGuard creates a small air space in front of the most vulnerable areas of your teeth, surrounded by an ultra stiff Aramid Crash Cage. It increases protection, without changing the thinness or breathability. We hope you appreciate this elegantly simple solution, that finally makes it affordable for fighters to get a custom mouthguard with AirSpace technology. And the extra protection you need, without using a much thicker, less breathable mouthguard.
Fitting Tip: Sucking, and pushing it against the back of your teeth with your tongue, is what makes a mouthguard stay on your teeth. Suck hard to start with a tight fit. Because it will fit looser when you remove the Fight Guard. Just trust the process- and do exactly what the videos say, when they say it.
Finally an Ultra Thin, Ultra Breathable mouthguard, with protection for fighting!
(Be sure to follow the videos very closely for a great fit!)
Fight Guard Fitting Videos

Video Part One: Instructions & Tips

Video Part Two: Fitting
Written Instructions (Must Watch Video Too)
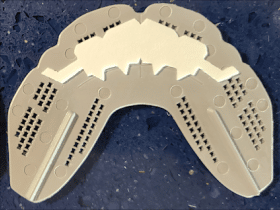
Important: This material is very unique, you must follow instructions exactly! FightGuard wearers, stick the included “FightGuard” on the dotted line exactly as shown. Then follow the standard instructions. Fit in front of a bathroom mirror. You’ll heat the unit, line it up per this diagram, fold it up against your teeth, close your mouth & suck. Don’t worry, you can re-do it if you get it wrong!

The following pictures show the Braces Guard. The instructions are the same for the Fight Guard:
Do NOT Use Boiling Water – It’s too hot & will ruin the unit!
Boil 8oz (1 cup) of water in microwave, & then add 3oz (a little less than 1/2 cup) of room temp tap water, to cool it to the right temp. Or use hot water from a coffee or espresso machine (Keurig, Nespresso, etc.) it’s the right temp. Set the hot water, mouthguard, fork & phone (use as timer!) in front of a bathroom mirror.
Attach BraceGuard. (Remove it after fitting)
Heat the unit in the hot water for 45 seconds. Remove it with a fork.
Hold it like this, with your thumbs on the bottom of the unit, on the thick cush pads.
Molding/Fitting

While looking in your mirror: Tilt your head back to see the bottom of your Molars (rear teeth).
- Push The Molar Ridges Up Into Your Molars, & hold it there.

Now tilt your head forward, & slide the unit to:
- Center Your Two Front Teeth on the lines below the Brace Guard. Use your tongue to help.
- Bite down lightly to hold it in place.

Quickly Fold Up the SIDES First!

Then the Corners & Front of the unit, under your lips.
- Don’t try to flatten it with your fingers. Close your mouth fast and use your lips to flatten it.
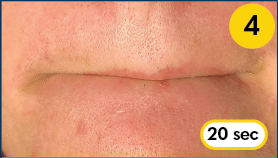
Close Your Mouth & Suck for 20 seconds, using your lips to pull the unit flat against your teeth.
- Use your tongue to push the inside against your teeth while you suck. Remove.
IMPORTANT! TO REMOVE, pull it off the back teeth first to tilt it. Next, pull it off the front teeth. (Reverse to put it on)
- After you finish the sections below, you will remove the BraceGuard, and it will fit much looser.
Fine Tune NOW

Flatten any areas along the top edge that are Folded or feel Pointy IMMEDIATELY NOW:

Reheat one small pointy area at a time in the water for ~10-15 seconds, until it starts to soften.

Put in mouth & use fingers to gently hold the area flat. Repeat for any area you want to flatten, or make more comfortable. Reheat the water if needed. *You can refit the entire mouthguard if needed.
Finally: You should be able to talk w/ it in your mouth. You should have to use your tongue or fingers to remove it.
Too tight? Heat in a microwave for 5 seconds only & check fit. Repeat until comfortable.
Too loose? Reheat water, & warm unit for 3-5 seconds only! Place in mouth and SUCK HARD for 60 seconds. Repeat if needed.
BulletProof Night Guard Fitting Videos
Your BulletProof NightGuard is made from an Advanced Composite Material, that’s Purpose Designed for Night Guards- to feel more natural, and to discourage clenching and grinding teeth. It’s also more durable and protects your teeth better, thanks to Aramid bullet proof vest material in the composite. And while the material is much softer than teeth enamel, it’s smooth, firm, and minimally compressible. Most “Night Guards” are just re-branded sports mouth guards, and use cheap transparent EVA material, that’s soft and springy. Soft and springy material can encourage teeth grinding and clenching- and lead to an unwanted all night “workout” for your jaw. That can cause soreness, headaches, and other issues. Our advanced composite material has a much higher flexural modulus to feel more natural, and discourage teeth clenching and teeth grinding.
Integrated Fresh Air and Saliva Hygiene Channels make it The Most Hygienic Night Guard On The Planet! Other nightguards trap stale saliva against your teeth and gums- all night every night- which can promote Bacteria Growth, Tooth Decay, Gum Disease, and Bad Breath. Studies show that consistent, natural saliva flow is necessary to help prevent bacteria build up and the other issues. As one of the only mouth guards specifically developed from the ground up to also serve as a night guard, we included fresh air and saliva hygiene channels, for your good health.
Your BulletProof NightGuard is the result of Advanced Materials and Design- employed with simple goal: Helping you get a Better, More Natural, and Healthier Sleep. It’s a massive improvement over existing night guards that haven’t changed much in 50 years, and are not Purpose Designed as night guards for your good health and good sleep.
Finally a Fully Custom Professional Night Guard that can be molded at home,
without the special machines that Dentists use. And for 90% less than they charge!
IT’S ALSO THE WORLD’S THINNEST, MOST BREATHABLE, AND MOST HYGIENIC NIGHT GUARD.
And you’re going to love it too!
(Be sure to follow the videos very closely for a great fit!)
Night Guard Fitting Videos

Video Part One: Instructions & Tips

Video Part Two: Fitting
Written Instructions (Must Watch Video Too)

Important: This material is very unique, you must follow instructions exactly! Do NOT use boiling water. Fit in front of a bathroom mirror. You’ll heat the unit, line it up per this diagram, & bite down to hold the unit in place. Then you’ll fold it up against your teeth, close your mouth & suck to customize your fit. Don’t worry, you can re-do it if you get it wrong!

Do NOT Use Boiling Water – It’s too hot & will ruin the unit!
Boil 8oz (1 cup) of water in microwave, & then add 3oz (a little less than 1/2 cup) of room temp tap water, to cool it to the right temp. Or use hot water from a coffee or espresso machine (Keurig, Nespresso, etc.) it’s the right temp. Set the hot water, mouthguard, fork & phone (use as timer!) in front of a bathroom mirror.
Heat the unit in the hot water for 45 seconds. Remove it with a fork.
Hold it like this, with your thumbs on the bottom of the unit, on the thick cush pads.
Molding/Fitting

While looking in your mirror: Tilt your head back to see the bottom of your Molars (rear teeth).
- Push The Molar Ridges Up Into Your Molars, & hold it there.

Now tilt your head forward, & slide the unit to:
- Center Your Two Front Teeth on the lines. Use your tongue to help.
- Bite down lightly to hold it in place.

Quickly Fold Up the SIDES First!

Then the Corners & Front of the unit, under your lips.
- Don’t try to flatten it with your fingers. Close your mouth fast and use your lips to flatten it.

Close Your Mouth & Suck for 30 seconds, using your lips to pull the unit flat against your teeth.
- Use your tongue to push the inside against your teeth while you suck. Remove.
Fine Tune NOW

Flatten any areas along the top edge that are Folded or feel Pointy IMMEDIATELY NOW:

Reheat one small pointy area at a time in the water for ~10-15 seconds, until it starts to soften.

Put in mouth & use fingers to gently hold the area flat. Repeat for any area you want to flatten, or make more comfortable. Reheat the water if needed. *You can refit the entire mouthguard if needed.
Finally: You should be able to talk w/ it in your mouth. You should have to use your tongue or fingers to remove it.
Too tight? Heat in a microwave for 5 seconds only & check fit. Repeat until comfortable.
Too loose? Reheat water, & warm unit for 3-5 seconds only! Place in mouth and SUCK HARD for 60 seconds. Repeat if needed.


